Have a Question?
Como configurar uma conta de e-mail no LigeroSmart para enviar e receber mensagens?
Uma das partes mais importantes de uma Central de Serviços, é conseguir ler uma conta de e-mails e transformar as mensagens enviadas em chamados, bem como enviar mensagens para os clientes a partir do sistema, utilizando esta conta.
Endereços de E-mail
O primeiro passo para isto ocorrer no LigeroSmart é, depois de logado como administrador, acessar o menu “Administração” –> “Endereços de E-mail” (que está no bloco “Comunicação e Notificações”):


Nesta tela, você pode clicar no endereço de e-mail padrão que vem na ferramenta, colocando os dados iniciais de sua conta de e-mail:

Salva e finalize 🙂
Configurando o recebimento de e-mails
Em seguida, vamos configurar o recebimento de e-mails.
Acesse “Administração” –> “Contas de E-mail Postmaster”:

Clique em “Adicionar Conta de E-mail”:

Agora coloque os dados de sua conta E-mail:

Note que você pode escolher diferentes protocolos de recebimento, tais como POP3S, POP3TLS, IMAPS e IMAPTLS.
Após configurado, o sistema baixa as mensagens de 10 em 10 minutos por padrão, mas isto pode ser ajustado.
Para forçar o teste de recebimento de e-mails, você pode clicar em “Obter E-mails” na listagem de contas cadastradas:

Configurando o envio de e-mails
Acesse Administração –> Configurações de Sistema.
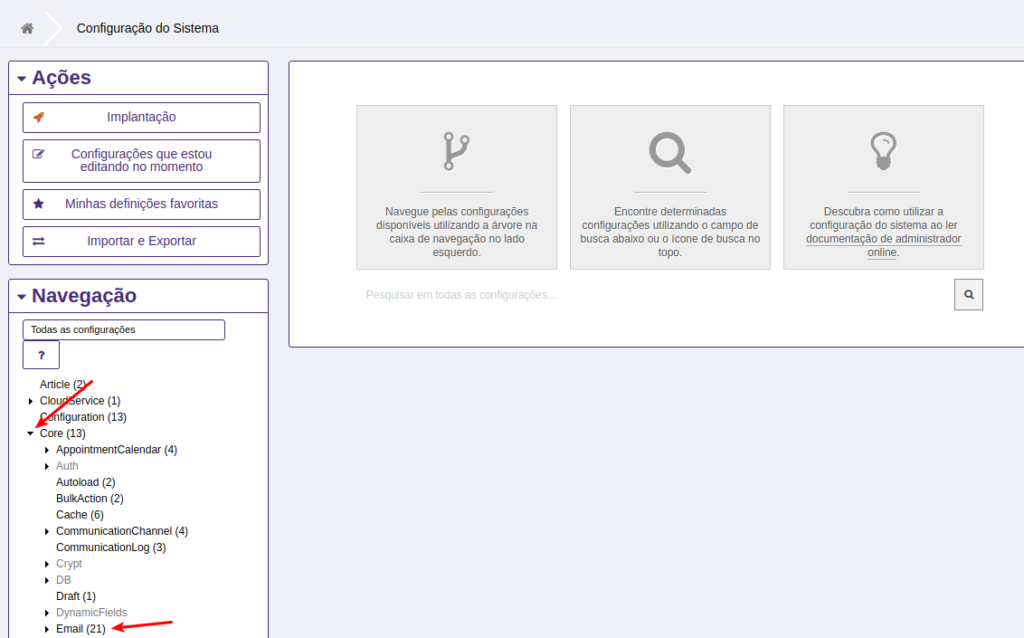
Em seguida, acesse o grupo de parâmetros “Core” e em seguida “E-mail”:

Na tela a seguir, uma série de parâmetros são exibidos. Este parâmetros tornam a ferramenta super flexível para ambientes que exigem notificações complexas. Neste momento, vamos alterar apenas aquilo que é necessário para começarmos a enviar e-mails pela ferramenta.
O primeiro parâmetro a ser alterado é o NotificationSenderEmail:

Quando você começar a editar o parâmetro, uma barra lateral laranja é mostrada, para que você saiba que aquele parâmetro ainda não foi salvo.
Você deve clicar então no ícone de confirmação conforme indicado na imagem acima, para confirmar a alteração. Quando você fizer isso, este parâmetro ficará com uma barra lateral verde, conforme a imagem abaixo:

Vamos alterar os demais parâmetros abaixo conforme seu sistema:
- NotificationSenderEmail: Coloque o endereço de sua conta de e-mails
- NotificationSenderName: Coloque um nome para sua conta, tal como “Suporte Minha Empresa”
- SendmailModule: Aqui você deve escolher qual protocolo será utilizado, SMTP, SMTPS ou SMTPTLS
- SendmailModule::AuthPassword: A senha de sua conta de e-mails
- SendmailModule::AuthUser: O login da sua conta de e-mails.
- SendmailModule::Host: O endereço do servidor de e-mails
- SendmailModule::Port: A princípio, não é necessário alterar este parâmetro pois o sistema identifica a porta na maioria dos casos. Se seu servidor possuir uma porta diferente para
Lembre-se de confirmar a alteração de cada parâmetro clicando no ícone de confirmação ao lado de cada parâmetro:

Feito isso, você precisa aplicar as alterações que fez nas configurações do sistema.
Acesse “Administração” –> “Configuração do Sistema” e clique no botão “Implantação”:

Uma tela com as alterações a serem realizadas será exibida, clique no botão “Implementar alterações selecionadas” e em seguida confirme no Popup clicando em “Implantar agora”:

Importante: você pode configurar muitas contas de recebimento, mas, por padrão, somente uma conta de envio. Desta forma, recomendamos que você tenha apenas uma conta de recebimento e envio inicialmente.
Existe um plugin da comunidade que permite o envio de mensagens por múltiplas contas, mas não abordaremos isto neste artigo que é mais voltado a quem está iniciando.
Feito isto, seu sistema estará pronto para receber e enviar mensagens por e-mail!