Have a Question?
Como notificar novos chamados no Telegram
ATTENTION: THIS DOCUMENT HAS BEEN UPDATED AND AT THE END WE EXPLAIN HOW TO NOTIFY DIFFERENT TELEGRAM GROUPS ACCORDING TO THE CALL QUEUE.
In May 2021 a member of the LigeroSmart community asked us: Is it possible to notify a group on Telegram when a ticket is created?
Taking advantage of the idea, we launched a small challenge for community participants: Who would be able to create such a notification using LigeroEasyConnector!
In the video below (about 9 minutes), we present the solution to the problem and, below, a step-by-step for you to replicate the feat and start receiving notifications on your Telegram:
Step-by-step to carry out the integration
1 - Create a BOT not Telegram (Write down your BOT Token provided by the Telegram Father Bot
2 - Create a group on Telegram with the BOT you created and with the other people who will be notified
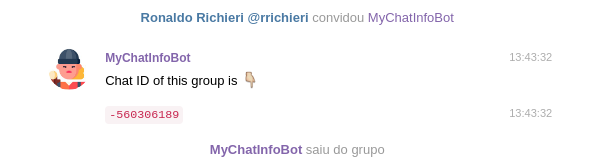
3 - Add the MyChatInfoBot BOT to this group. What this BOT does is to show the group ID, which will be used in the integration. Example:
4 - Access LigeroSmart and go to Administration -> Web Services
5 - Add a Web Service, put the name you prefer (I will use Telegram in the example), add a Network Transport as "Requester" like LigeroEasyConnector :: REST and click on the “Save” button
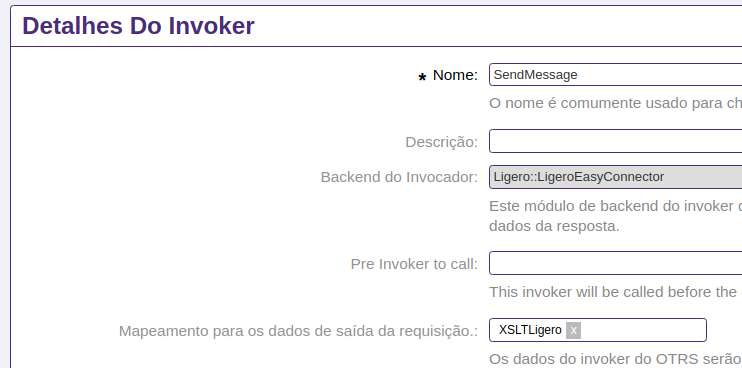
6 - Still in the "Requestor" area, click on the "Add invoker" box and select Ligero :: LigeroEasyConnector
7 - Enter the name you prefer (in the example I used SendMessage) and add a mapping of the data from the Requisition output, selecting XSLTLigero:
Click on “Save”
8 - Add the “TicketCreate” Trigger. Don't forget to click on the + as below (Save again then):

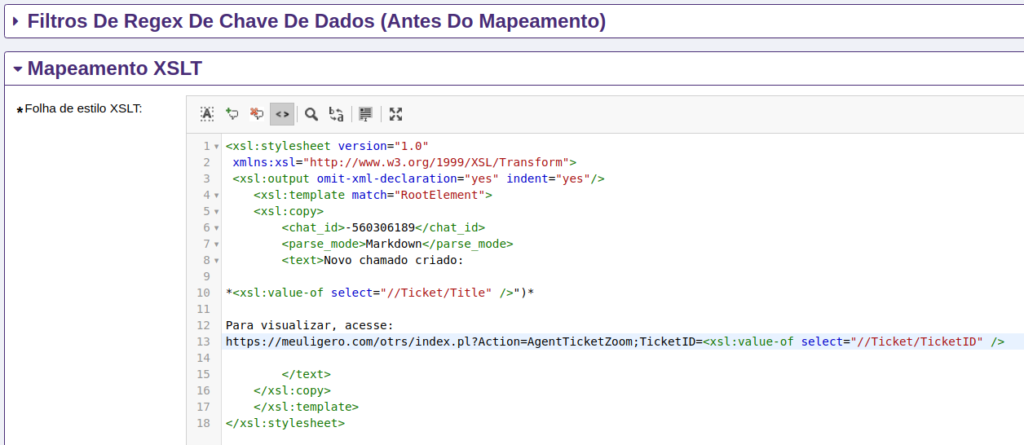
9 - Click To set up in the XSLTLigero mapping and add the code below:
-560306189 markdown New ticket created: * * To view, go to: https://meuligero.com/otrs/index.pl?Action=AgentTicketZoom;TicketID= It will look like this:
(Adjust the URL to view the ticket as needed)
click in Save and Finish and when you return to the Invoker screen, click once more on the Save and Finish. You will be returned to the Web Service screen being created
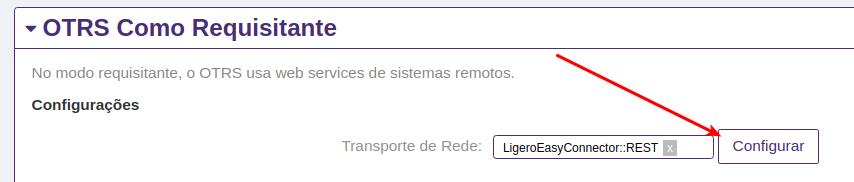
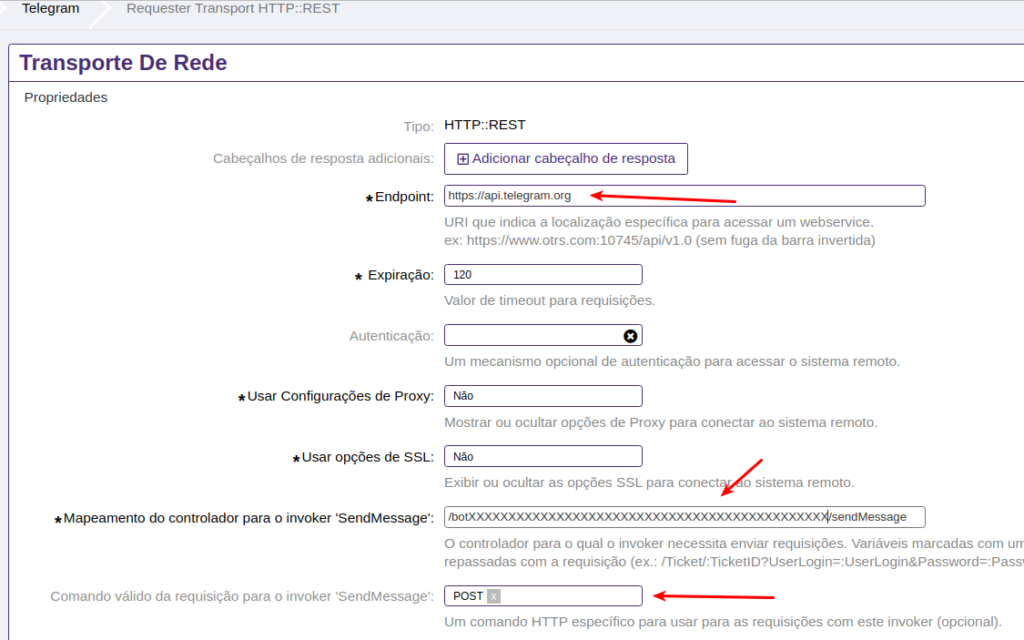
10 - Click on the Configure button of our Network transport as Requestor:
11 - Adjust the following parameters:
- Endpoint: https://api.telegram.org
- * Controller mapping for 'SendMessage' invoker: / botXXXXXXXXXXXXXXX / sendMessage
(Replace XXXXXXX with the BOT Token you created) - Valid request command for invoker 'SendMessage': POST
It will look like this:
Save, Finalize and perform your tests.
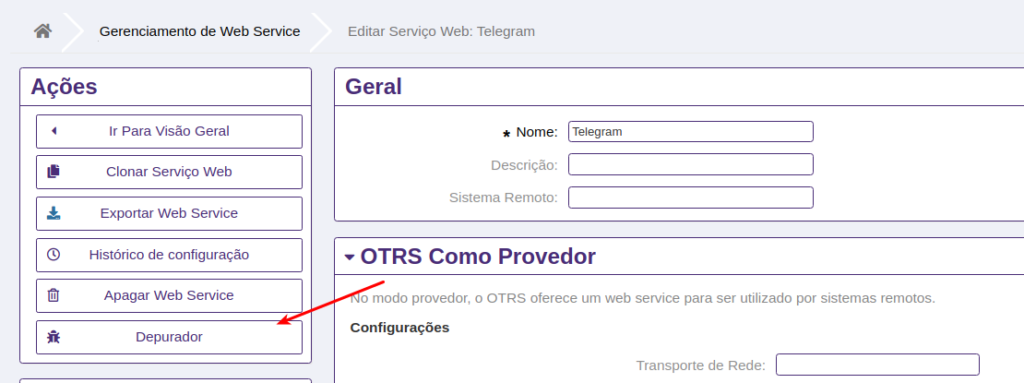
You can track the result in the Web Service Debugger:
Notify different groups on the Telegram according to the Call queue
One way to notify different groups is to adjust the Chat ID of each group in XSLT, according to the queue, using the property xsl:choose.
IMPORTANT: You need to add the BOT you created in every group you want to send notifications.
In the example below, we can use the same message template to notify two different groups on the Telegram, according to the ticket queue (//Ticket/Queue):
<xsl:stylesheet version="1.0"
 xmlns:xsl="http://www.w3.org/1999/XSL/Transform">
 <xsl:output omit-xml-declaration="yes" indent="yes"/>
    <xsl:template match="RootElement">
    <xsl:copy>
        <chat_id><xsl:choose>
            <xsl:when test="//Ticket/Queue='Raw'">-560306189</xsl:when>
            <xsl:when test="//Ticket/Queue='Junk'">-574581430</xsl:when>
            <xsl:otherwise>-574581430</xsl:otherwise>
        </xsl:choose></chat_id>
        <parse_mode>Markdown</parse_mode>
        <text>Novo chamado criado:

*<xsl:value-of select="//Ticket/Title" />*

Para visualizar, acesse:
https://meuligero.com/otrs/index.pl?Action=AgentTicketZoom;TicketID=<xsl:value-of select="//Ticket/TicketID" />

        </text>
    </xsl:copy>
    </xsl:template>
</xsl:stylesheet>
You can also send different texts according to the queue, that is, each group can receive a different template. In this case, XSLT would look like this:
<xsl:stylesheet version="1.0"
 xmlns:xsl="http://www.w3.org/1999/XSL/Transform">
 <xsl:output omit-xml-declaration="yes" indent="yes"/>
    <xsl:template match="RootElement">
    <xsl:copy>
        <xsl:choose>
          <xsl:when test="//Ticket/Queue='Raw'">
             <chat_id>-560306189</chat_id>
             <text>Novo chamado criado:
*<xsl:value-of select="//Ticket/Title" />*
Para visualizar, acesse:
https://meuligero.com/otrs/index.pl?Action=AgentTicketZoom;TicketID=<xsl:value-of select="//Ticket/TicketID" />
            </text>
          </xsl:when>
          <xsl:when test="//Ticket/Queue='Junk'">
             <chat_id>-574581430</chat_id>
             <text>New ticket created:
*<xsl:value-of select="//Ticket/Title" />*
https://meuligero.com/otrs/index.pl?Action=AgentTicketZoom;TicketID=<xsl:value-of select="//Ticket/TicketID" />
            </text>
          </xsl:when>
            <xsl:otherwise>
             <chat_id>-560306189</chat_id>
             <text>Novo chamado criado:
*<xsl:value-of select="//Ticket/Title" />*
Para visualizar, acesse:
https://meuligero.com/otrs/index.pl?Action=AgentTicketZoom;TicketID=<xsl:value-of select="//Ticket/TicketID" />
            </text>
            </xsl:otherwise>
        </xsl:choose>
        <parse_mode>Markdown</parse_mode>

    </xsl:copy>
    </xsl:template>
</xsl:stylesheet>
Restricting firing to just a few rows
If you want the notification to be triggered only when the ticket is created in one or more specific queues, edit the Invoker trigger by clicking the edit button as below:

Then add the filter with the name of the queue(s), as follows:
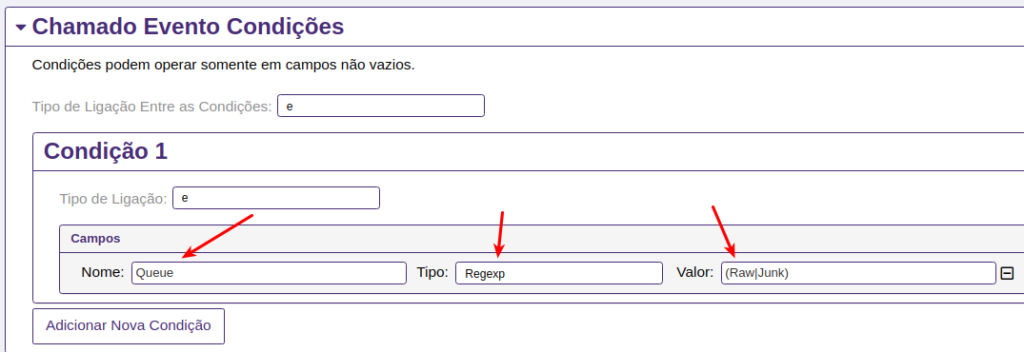
Note that we chose the Regexp option to be able to define that the notification will be triggered only when the call is created either in the Raw queue or in the Junk queue.