Have a Question?
Atendimento com LigeroSmart – Painel de Controle
Getting to know the LigeroSmart Control Panel (Attendant Interface)
Presentation
The following pages describe a way to operate this system. This is just a suggestion of
use in relation to functionality. What we propose, however, is that from the
free experimentation of using the tool, your team will take ownership and create your own “way of using”,
thus taking advantage of all the creative potential that your team may have in relation to LigeroSmart.
Logging in
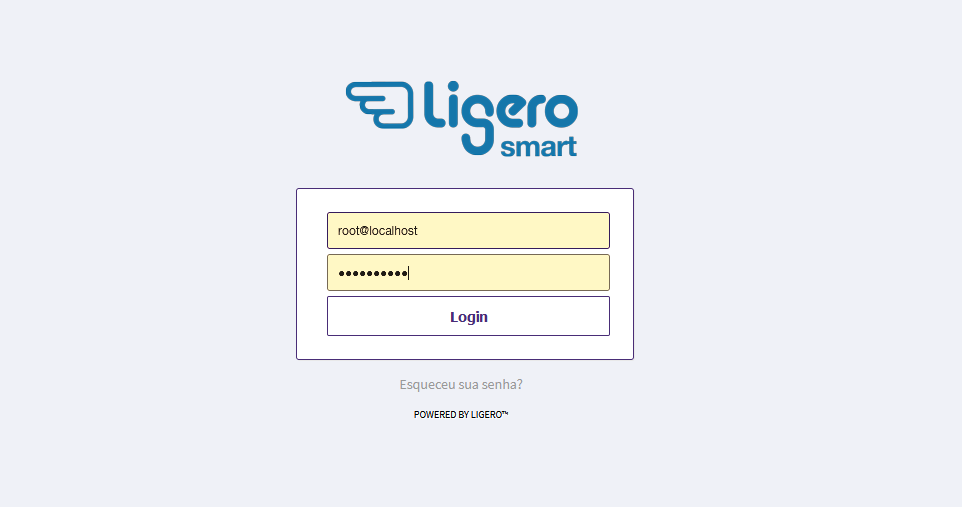
The attendant interface is accessed through the link:
http: //IP_DO_SERVIDOR/otrs/index.pl
Through this link, a screen will be displayed where the attendant must enter his login and password and click on
“login” button.
Getting to know the service interface
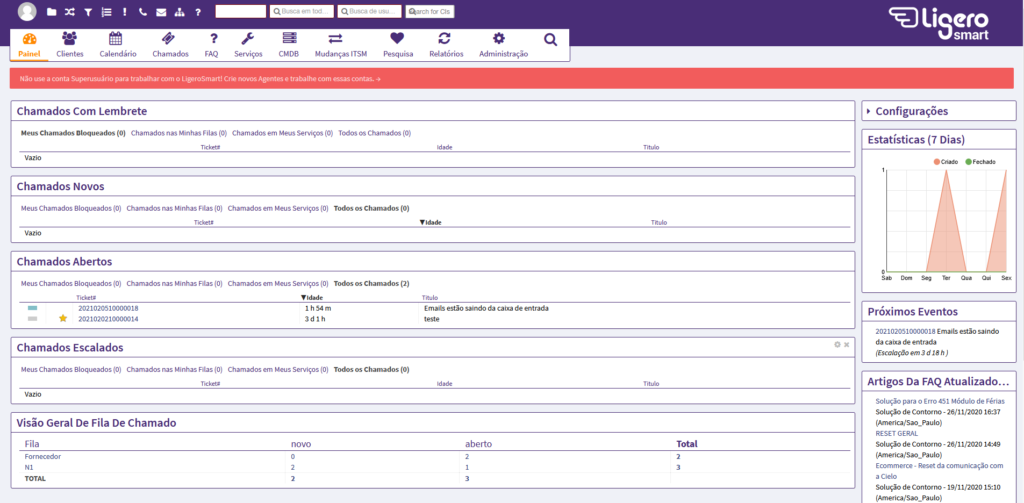
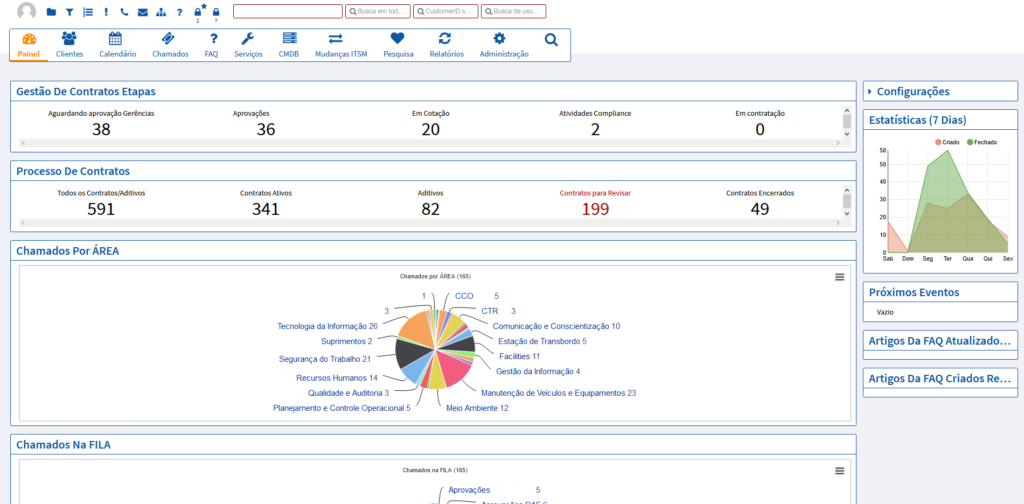
This is the area where the attendant has an overview of the calls and their activities. It is composed
by various Widgets that can be enabled or disabled through the “Settings” menu
pointed out in the previous image.
We will see below, the standard widgets of the LigeroSmart system
Call Listing Widgets
New Calls:

Tickets created by email or the client interface that have not yet had
attendant interaction.
Open Calls:

Calls in progress, that is, those who have already had some type of interaction from the attendant.
Reminder Calls:

In this box will appear the calls that reach the "pending date"
specified (check pending states)
Escalated Calls:

Calls that have already had their solution, update or response deadline
exceeded.
Running Process Tickets:

Called running process. This widget shows the step
current status of the call.
Overview of ticket queue:
Visualization of all calls in queues in the system.

loved ones in the queues that the attendant has
read permission.
Next events:
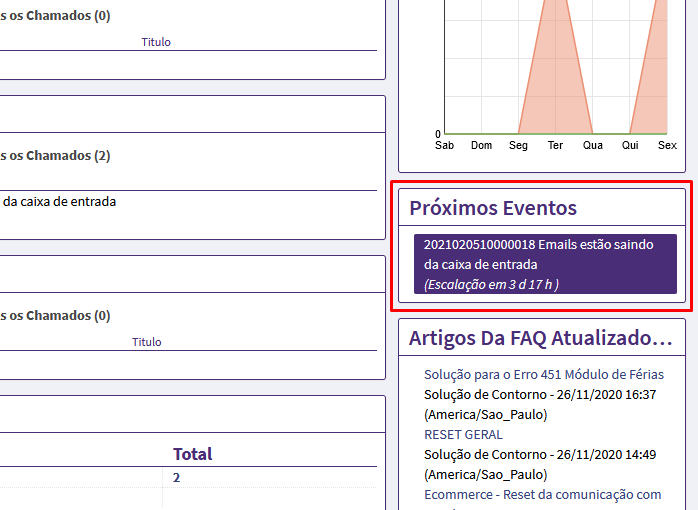
A widget that informs you which are the next calls that will escalate or
will reach your reminder time.
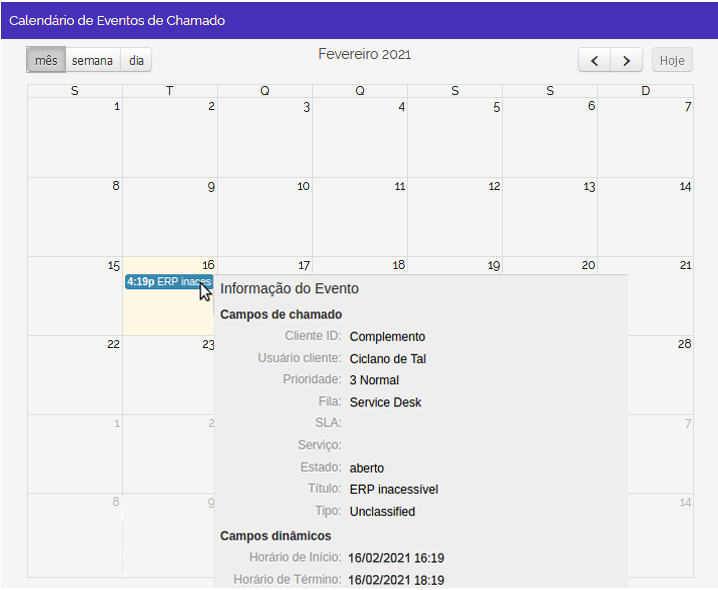
Calendar of ticket events:
In this box, it is possible to make and view the scheduling of the attendance of the ticket;
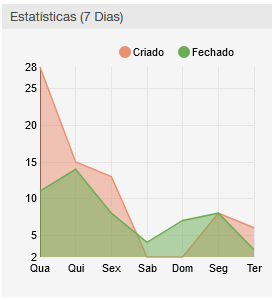
Statistics:
a dashboard which shows the number of tickets created and closed in the last 7 days;
Customizing your Dashboard
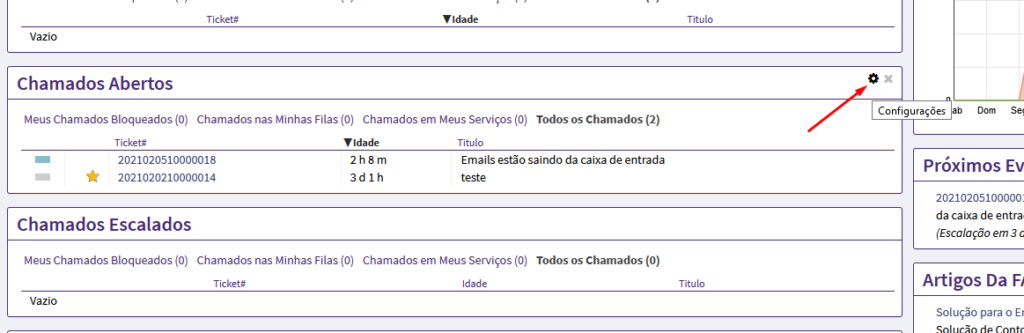
We can configure each of these boxes by hovering the mouse over the title bar, clicking on the
gear and adding fields that we believe are relevant to our service.
Additional widgets
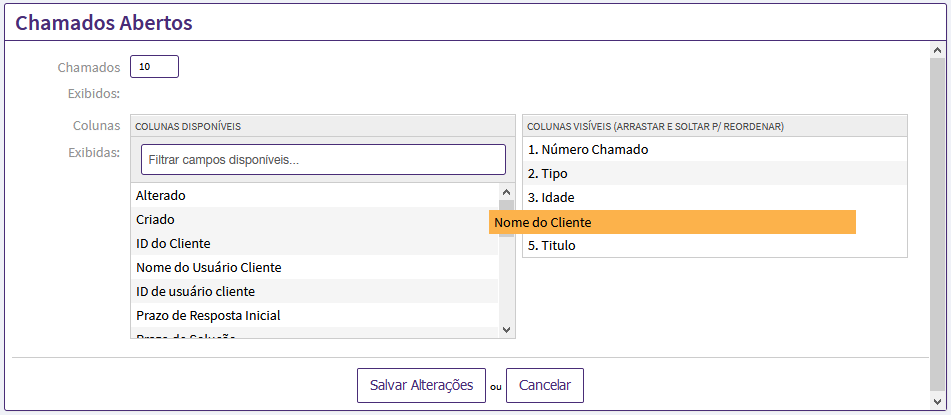
Click and drag the columns from left to right to add to the Widget.
Afterwards, just click on Save Changes.
Call Menu:
In this menu the attendant has access to different views of the tickets as well as to create new tickets. The main submenus are described below.
At the top of the system, we also have icons for quick access to the same ticket menus.
Let's meet them:

Queue View:
Here the attendant has a view of all the queues for which he serves or where he has permission to view for consultation.
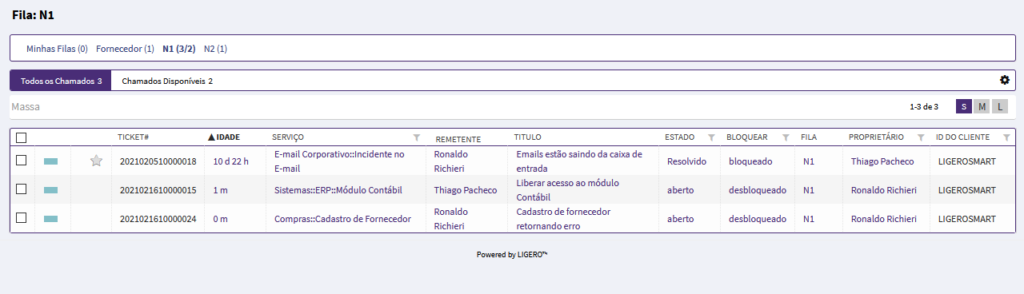
Important informations:
- The number in parentheses indicates the number of calls available in that queue.
- The “My Queues” link shows tickets for all queues selected by the user in the “Change Personal Preferences” menu (see Changing Your Personal Preferences)
- The “Available tickets: X” link that is selected by default, shows only those unblocked tickets that are in the selected queue. X is the number of calls in this situation.
- The link “All calls: X” shows, in addition to the available calls, all calls not yet closed in this queue, blocked (by you or another attendant) and not blocked.
- The buttons (links) S, M and L, located to the right of the screen, allow us to choose different views of the tickets in this row. S (Small) shows us a more summarized listing, with more calls per page. M (Medium) brings us to the standard view, with some more information. L (Large) shows us a lot of information and already allows us to take some actions from the called list screen.
- In the S (Small) view, we can sort the tickets in different ways by clicking on the name of one of the available columns. By clicking on the same column again, we inverted its order from ascending to descending.
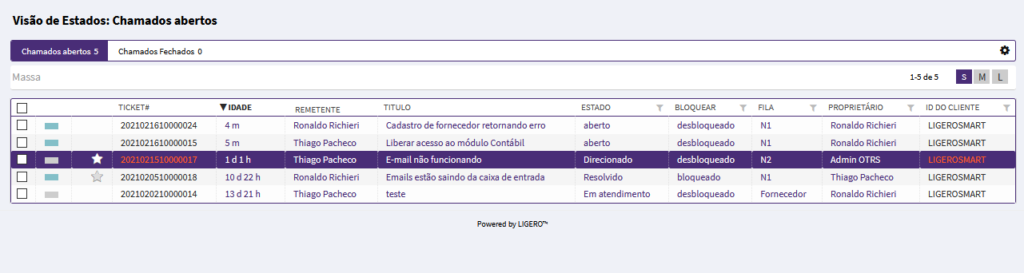
State Vision
In this screen, the attendant has a view of the tickets by ticket status.
Escalation View
In this area, the attendant visualizes the calls that exceeded the time limit agreed in the SLA, as well as the possibility to view the calls that will exceed these times in the coming days.

New Call via Phone
When an attendant receives a call from a customer, he must register this service by entering all the customer data necessary to continue the service of the request by creating a New call by phone.
Below we have the screen “New Call Via Phone” in its default configuration. We will comment on each of the points of the same:
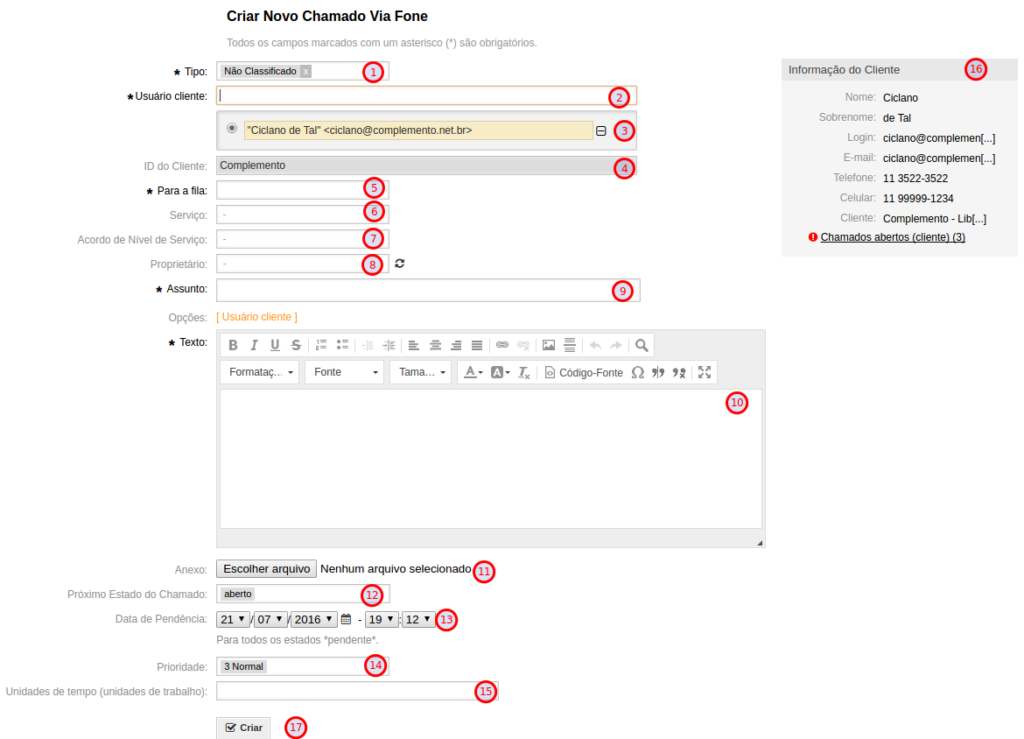
- Type of ticket, which may be Unclassified, Incident, Problem, Requisition, etc.
- Field for searching the customer of the ticket. The search is performed while typing its name or email.
- Customer selected after the survey (the data for which is available in item 16).
- Customer ID (See Appendix 02 - Glossary). It is automatically set when the customer is selected.
- Queue in which the ticket will be created.
- Ticket service (By default, it is not mandatory to select).
- Call SLA.
- Owner. When creating the ticket, if we leave this field blank, the ticket will remain unblocked, that is, without an attendant effectively assigned to attend it. If we want, we can fill in this field at this point and already determine who will be the attendant assigned to that activity.
- Subject of the call.
- Description of the request.
- Here we can attach one or more files, however, by default, only one at a time.
- Call status (see attachment 02 - Glossary).
- Pending Date. Date on which the ticket will reach the pending status, if a state of the pending or automatic pending type is selected (see here).
- Priesthood of the Call.
- Time spent on the activity (see glossary).
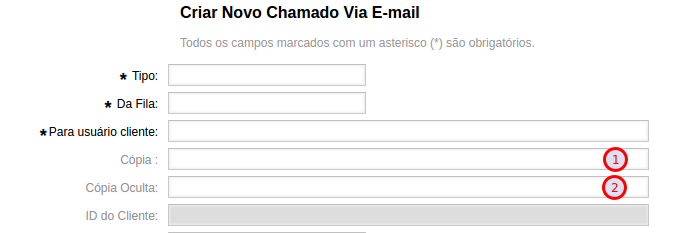
New Call via E-mail
If one wants to create a ticket already requesting or sending information by e-mail to the customer, the customer can use the “New Call E-mail” menu, which allows, for example, the sending of attachments to the requestor's e-mail.
The main difference between this screen and the “New Calling Via Phone” screen is that Novo Chamado Via E-mail has two additional fields to inform e-mails that will be placed in copy (item 1) or blind copy (item 2):
To search for
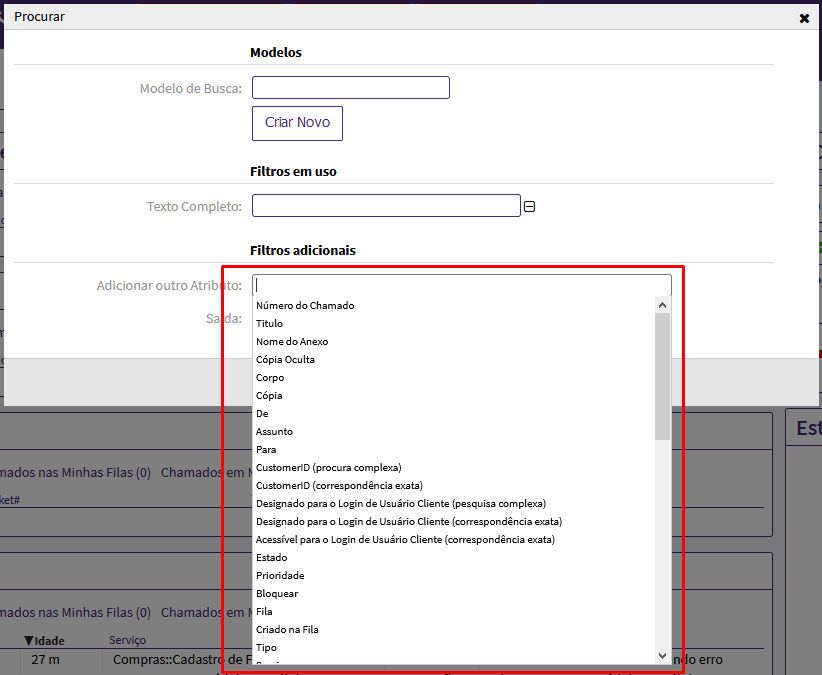
It has an interface where it is possible to create search models. There is the option of using filters, such as "status", "time of creation of the ticket", "Owner of the ticket", "queue", and also define the type of output: normal (on screen), printed or in csv file.
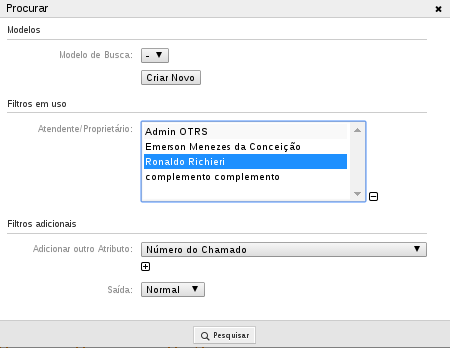
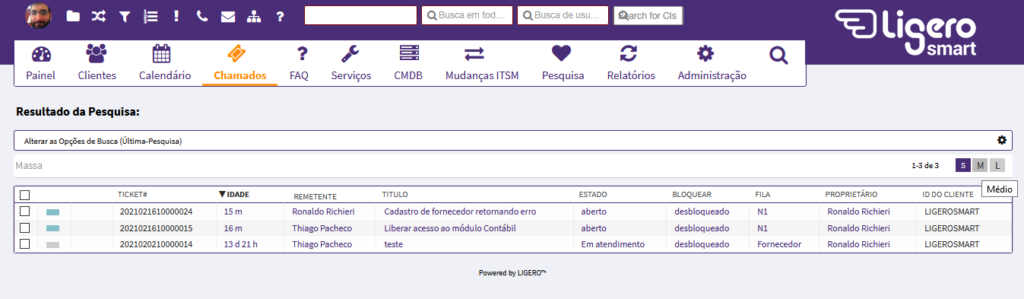
Example: In this case I am filtering all calls from the attendant Ronaldo Richieri, Normal Output, Result of my search is below.
Ticket Searches
When these searches are enabled, we can have some types of searches possible in LigeroSmart. Are they:
Complete Search
This type of search performs a search for any word that is in the ticket field (Ex: the ticket number).

Search by User (Client ID)
This type of research performs a search for calls from a certain company, through the ID.
Search by client user
This type of research performs a search for calls from a specific user of a company.

Searching for CIs (Configuration Items)
Searches the Configuration Items for a given CI category.
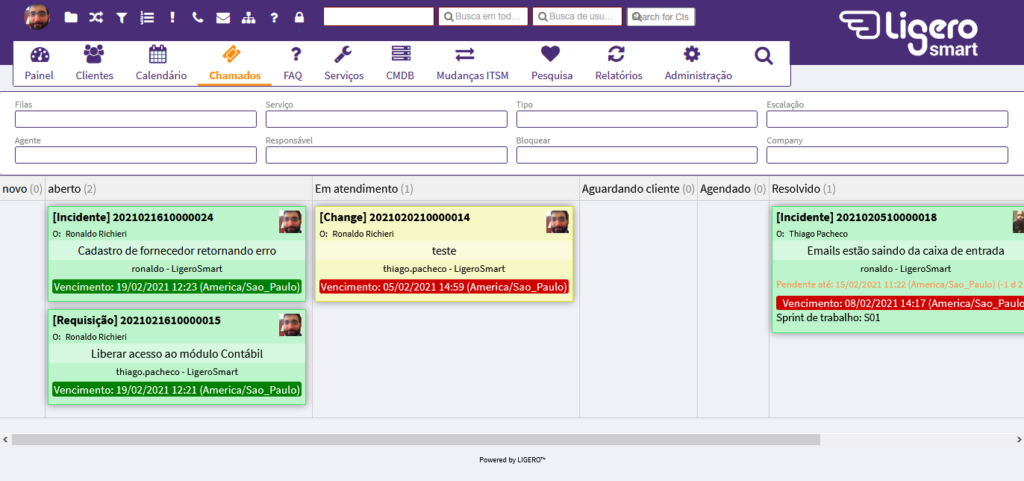
Kanban View
A form of vision and call attendance that provides great resourcefulness, click here to know more
Magnifying glass

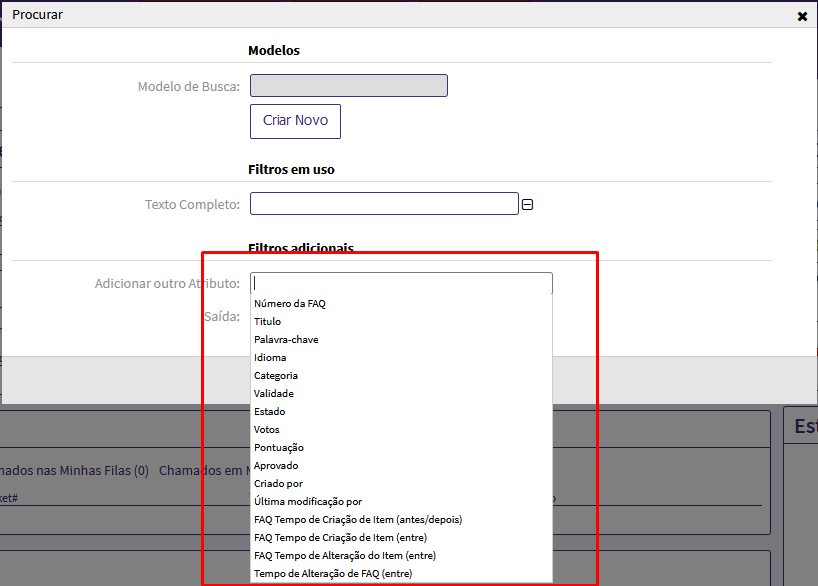
Undoubtedly a powerful way to search for Calls, FAQs, CIs and other information in the system.
As a kind of “wildcard” search depending on the system area you are in, the search filters / attributes will be displayed according to the system area.
It has an interface where it is possible to create search models. There is the option of using filters, such as "status", "time of creation of the ticket", "attributes", and also to define the type of output: on screen, in print or in csv file.
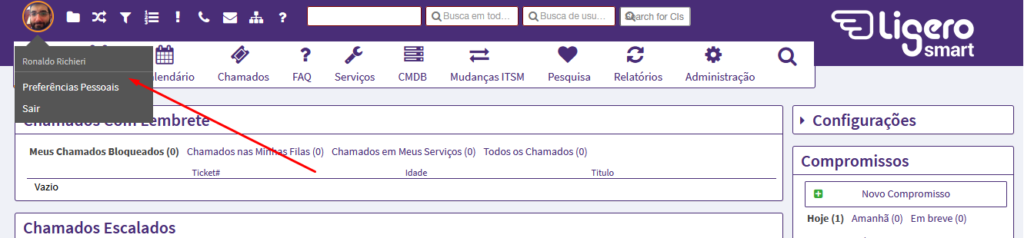
Changing your personal preferences
By default, OTRS displays the pre-defined settings by the administrator for receiving notifications of e-mail calls that enter their queues, however the attendant can change the way they receive these notifications, and other settings, by accessing the personal preferences screen. .
To change your preferences you must click on the “user” icon or on your forum in the upper left corner of the control panel screen.
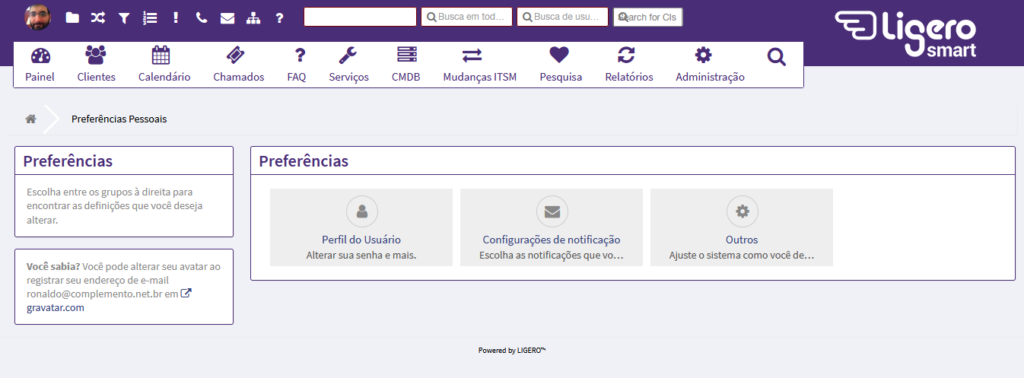
User Profile
Change Password: changing the current attendant password.
Note: If the system is integrated with your organization's AD, this item will be disabled.
Avatar: You can add your avatar following the instructions on gravatar.com by associating a profile image with your email in the system.

Ilanguage: Change of language being able to select any that are available
FOROut of Office period: In case an attendant is on vacation or leave this option can be enabled and put the Start and End date. This option can be configured to display on the screen of the other attendants, in the Control Panel - Configuration - Enable the field Outside the Office. The following screen will appear:

TIP: In large installations, we realize that enabling “Out of the Office” features can slow down the system.
Notification Settings
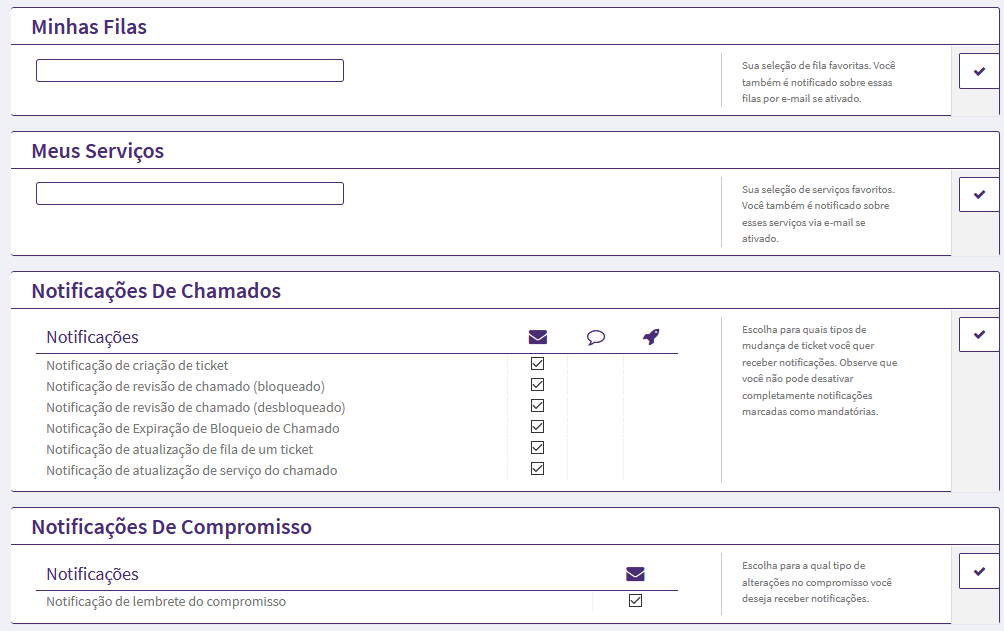
My Queues
The attendant will be able to select, from the queues he has access to, which ones he wants to receive standard notifications, such as creating a new ticket, follow up, etc.
My services
The attendant can select his / her work Service (s) in the “My Services” box. This allows them to view specific service calls in the control panel widgets, as well as receive notifications based on their services.
Notifications
Finally, the attendant can define which notifications he wants to receive. The choice of these notifications must be released by the LigeroSmart Administrator, some of which may be mandatory.
Other Settings
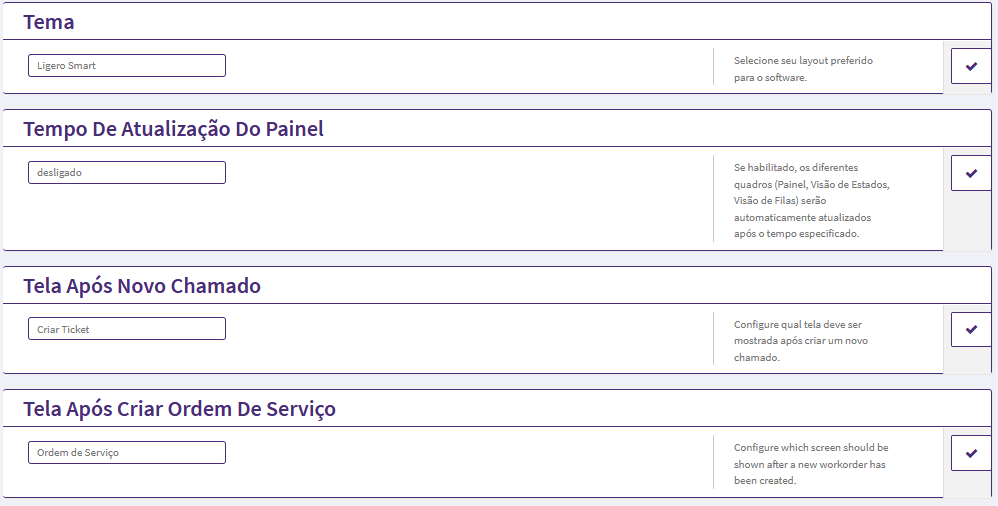
Theme: By default we have Ligero Smart, you can have other themes in your installation.
Panel Update Time: Defines how many minutes the panel should be updated.
Screen After New Call: Defines which screen the attendant will see after creating a call on the New Call Phone or E-mail screens. The CreateTicket option will cause the OTRS to show a new blank ticket creation screen after creating a ticket, while the TicketZoom option will cause the system to direct the attendant to the newly created ticket display screen.
After Creating Service Order screen: After creating a work order, we can configure which screen to be displayed after creating the work order. Being them "ChangeZoom","WorkorderZoom”.
Using the tool
Accessing tickets
There are a few ways to access a new ticket in the system. When it is created by a customer (requester), LigeroSmart automatically notifies the attendants of the queue responsible for e-mail, sending a message that contains a direct link to the ticket. Just click on this link to access the ticket in question.
When clicking on the link sent to the email, the attendant will be directed to the screen with the possible actions to be performed on this call.
From this area, the attendant must start interacting with the ticket following the steps described below.
First call handling - Block the call
The first action that the Service Desk analyst must take when receiving a new call is to block the call for you.

When the attendant clicks on “Block”, he becomes the owner of the ticket, having the obligation to conduct the solution of the request.
This option allows calls not to be answered in duplicate causing confusion in the service.
Interacting with the customer (requester) by phone or email
After the call is blocked, we will start the service by interacting with the customer by phone or email.
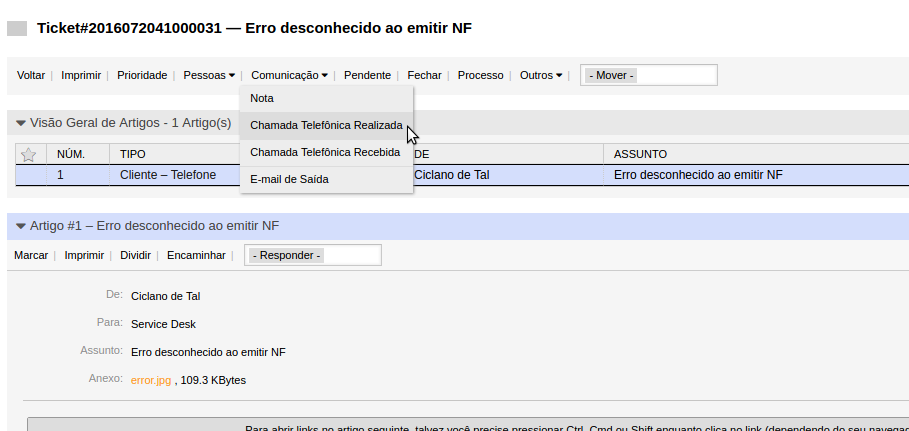
Telephone interaction
If we make a telephone contact with the customer, we click on “Communication → Telephone Call Made” and the system will open a window to enter the information for this contact.
As our telephone contact with the customer develops, we record the conversation by adding information that will facilitate the next stages of service.
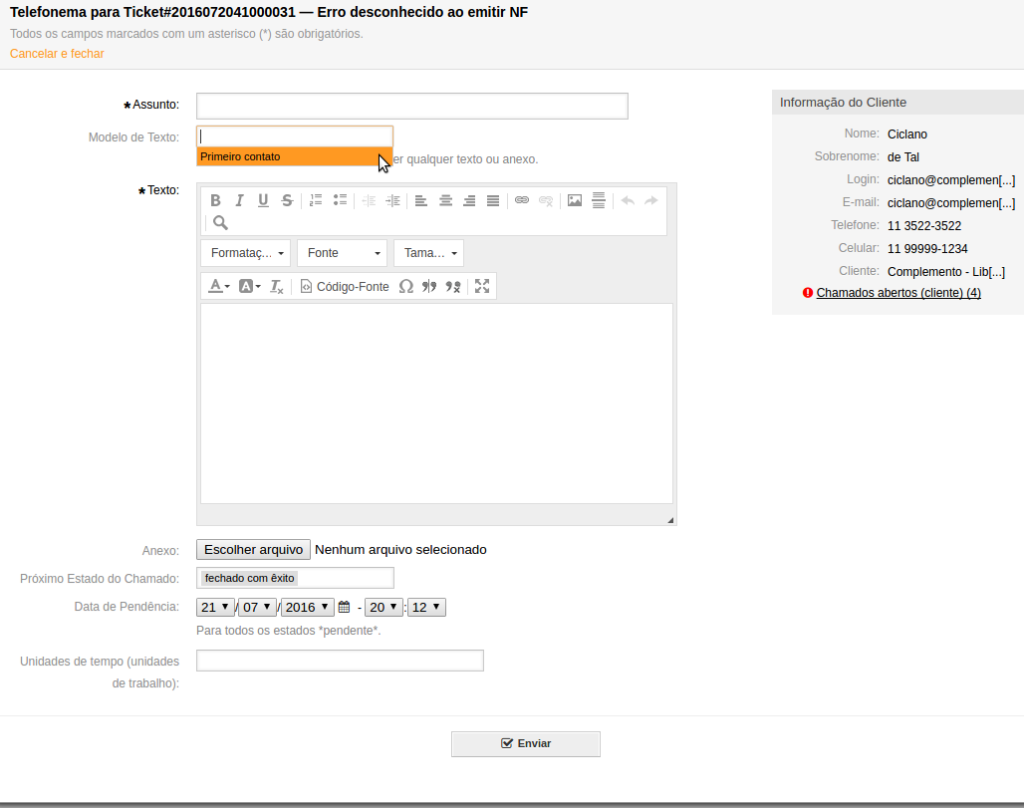
See that it is possible to work even with pre-defined answers to streamline the work of the attendant.
In the option “Next call status” we select the option corresponding to the current changes if we want to change its status. (see ticket status)
We completed this step by clicking submit.
Email interaction
To continue the service by contacting the customer by email, just click on “- Reply -” and choose one of the possible response templates on the call detail screen.
A new window containing the chosen response template will open.
On this screen, we can insert all the information we deem necessary to provide the service and send it to the customer, filling in the “Text” field.
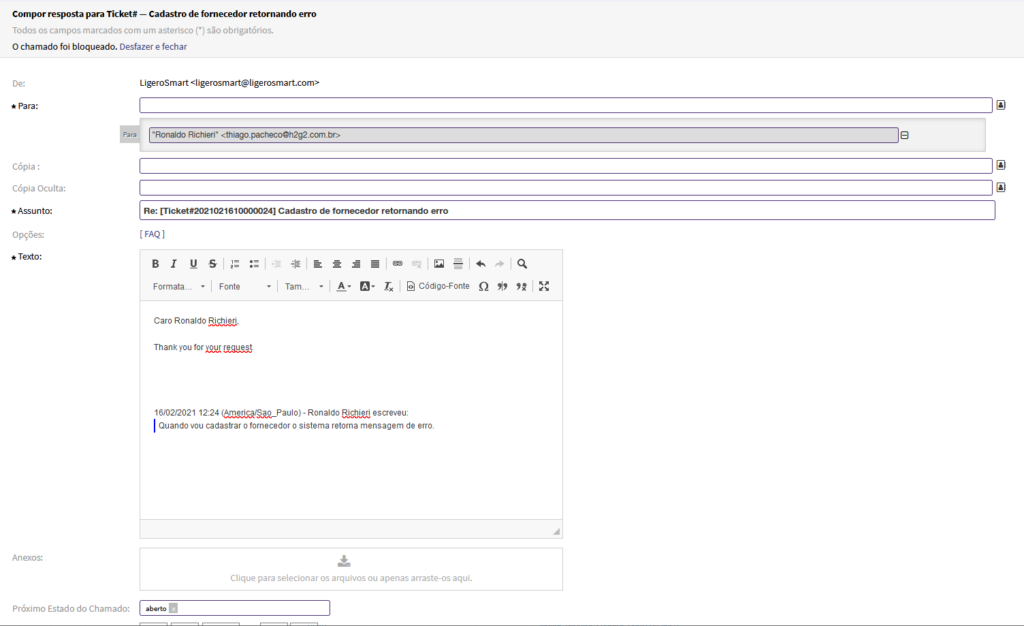
In the option “Next call status” we select the option corresponding to the current changes if we want to change its status. (see ticket status)
We completed this step by clicking submit.
Adding Notes
To add a note to the ticket, click on “Communication → Note” on the ticket detail screen and the system will open a screen to enter additional information relevant to this ticket, we can also select a note template.
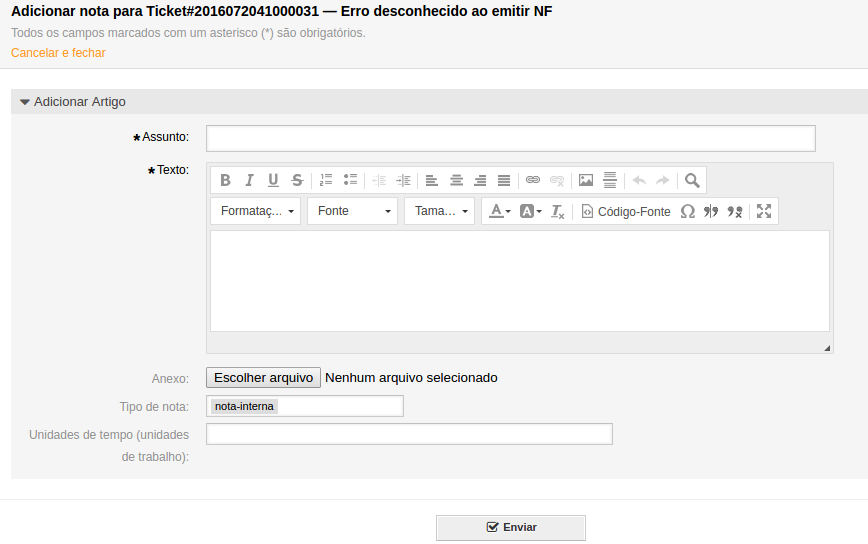
In the Note type field, we select whether it will be internal or external.
We completed this step by clicking submit.
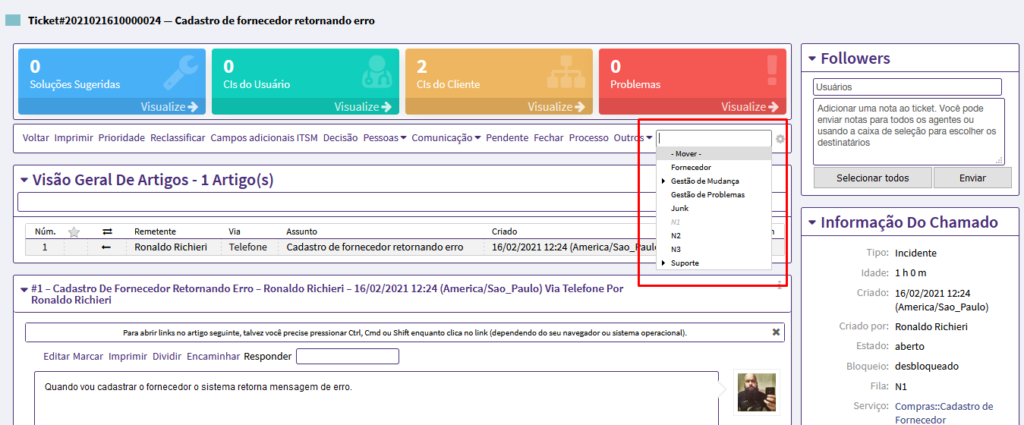
Modify queue
After the reclassification of the call and the treatment in its original queue, a call can be forwarded to attendance in other queues that will continue if this call depends on a specialized or specific performance.
To move a ticket to another queue, you need to click on “Move” on the ticket details screen.
When clicking on “Move”, a screen will open to choose the queue to which we want to move the ticket.
Ending the Call
To perform this action, the attendant can choose one of the following options:
Obs. This is just a basic guideline for a form of call closure, which will vary according to the flow determined by your organization.
- Sending an email response to the customer: While in the ticket details screen, select an article created by the customer, then click on “- Reply -” and then select a response template (the default is “Blank”). Write a message to the customer in the Text field of the window that will open and choose one of the closing states of the ticket.
- Calling the customer: In the call detail screen, click on “Telephone call made”. Record some details of your conversation with the customer in the Text field, choose one of the closing states of the ticket and click Send. We can also add a template for phone calls by clicking on “Text Template”
- Clicking on the “Close” button on the ticket details screen: In this way, no notification is generated for the customer, therefore, this function should be used as a last resort.